
Gardening Projects and Crafts
Millstone Fountain Poetry stone Bricks Texas Melted Snowman Japanese Lantern Cheap Garden Globes
 Millstone Fountain
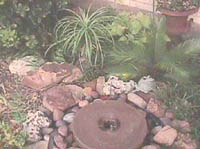
A millstone makes an interesting fountain and it already has a hole in the middle. Here are the supplies you will need to make this project:
 Millstone
large round pond liner
round stones
fountain pump
plastic tubing about 10 inches long, sized to fit the pump
four plastic pots, 3 inches shorter than your liner
old panty hose
scissors to cut tube and pantyhose
grounded electrical circuit approved for outdoor use
I used a round rigid pond liner container that was about a foot deep and about three feet in diameter. The size is up to you. The important thing is that your pots must be about 3 inches lower than the rim of your container when you placed standing up in it. I used decorative river stones for the top of the pond and plain rocks from my yard underneath. Step One: Dig a smooth hole in the ground the same depth as your liner and place the liner in the hole. Make sure that the liner sits in the hole level with no humps or rocks. Don't take a chance on judging by eye whether or not you have it level; this is very important. You want the water to be even when it is filled.
Step Two: Poke several holes in the sides of each pot so that water can pass freely through them. Place the pots in the liner so that they form a base that your millstone can sit on, with one pot in the center, the others spaced around it evenly. Test to see if the millstone sits firmly on top of these supports; you can add another pot if you need to for greater stability.
Step Three: Take out the center pot and cut a V-shaped groove in the top. Cut a leg off your panty hose and stretch it over the pot you just cut a V in. This is going to form a filter to keep leaves and debris away from your pump. Place the pot back in the middle so that the groove faces in the direction your electric cord from the pump will be going and have the panty hose opening at the top (side with the V cut into it). Place the fountain pump into this pot and position the electric cord through the V notch and out toward the electrical outlet. Don't plug it in at this time.
Step Four: Fill the area around the bottom of the liner around the pots with clean gravel or rocks. When you get to the top three or four inches, start placing your decorative stones so that the "junky" rocks are completely covered. Keep building this up until the rocks are flush with the ground. Edge your fountain with larger decorative rocks and tropical looking plants, if you wish.
Step Five: Connect the plastic tubing to the pump in the middle pot and carefully position the millstone over it so that it rests firmly on the pots and the tubing is coming out through the hole. Make sure the cord is positioned in the V notch you cut, and that it is not being pinched or poked by any rocks.
Step Six: Take a look at everything and see that all is as you want it to look. Cut the end of the tubing off level with the top of the hole in the millstone.
Step Fill the fountain with water until it is even or a little below the top of the decorative stones. Plug in the fountain. You may need to adjust the flow of the water. If so, unplug the fountain and carefully remove the millstone. Don't pinch your fingers! Reach down and pull up the pump. It will have a sliding gauge on it somewhere. Adjust the gauge (try half-way), and replace the pump and the millstone. Try again, and re-adjust if you have to until you are happy. You may need to cut a little more off your plastic tubing to get it just right.
Step Eight: Plant the area around the fountain and decorate as desired. Remember to follow all safety rules for the use of electricity and water! Use a plug that is approved for outside use and has a ground fault interrupter. If you have any questions about the electrical part of this, please be sure to ask before you get yourself electricuted!
Step One: Dig a smooth hole in the ground the same depth as your liner and place the liner in the hole. Make sure that the liner sits in the hole level with no humps or rocks. Don't take a chance on judging by eye whether or not you have it level; this is very important. You want the water to be even when it is filled.
Step Two: Poke several holes in the sides of each pot so that water can pass freely through them. Place the pots in the liner so that they form a base that your millstone can sit on, with one pot in the center, the others spaced around it evenly. Test to see if the millstone sits firmly on top of these supports; you can add another pot if you need to for greater stability.
Step Three: Take out the center pot and cut a V-shaped groove in the top. Cut a leg off your panty hose and stretch it over the pot you just cut a V in. This is going to form a filter to keep leaves and debris away from your pump. Place the pot back in the middle so that the groove faces in the direction your electric cord from the pump will be going and have the panty hose opening at the top (side with the V cut into it). Place the fountain pump into this pot and position the electric cord through the V notch and out toward the electrical outlet. Don't plug it in at this time.
Step Four: Fill the area around the bottom of the liner around the pots with clean gravel or rocks. When you get to the top three or four inches, start placing your decorative stones so that the "junky" rocks are completely covered. Keep building this up until the rocks are flush with the ground. Edge your fountain with larger decorative rocks and tropical looking plants, if you wish.
Step Five: Connect the plastic tubing to the pump in the middle pot and carefully position the millstone over it so that it rests firmly on the pots and the tubing is coming out through the hole. Make sure the cord is positioned in the V notch you cut, and that it is not being pinched or poked by any rocks.
Step Six: Take a look at everything and see that all is as you want it to look. Cut the end of the tubing off level with the top of the hole in the millstone.
Step Fill the fountain with water until it is even or a little below the top of the decorative stones. Plug in the fountain. You may need to adjust the flow of the water. If so, unplug the fountain and carefully remove the millstone. Don't pinch your fingers! Reach down and pull up the pump. It will have a sliding gauge on it somewhere. Adjust the gauge (try half-way), and replace the pump and the millstone. Try again, and re-adjust if you have to until you are happy. You may need to cut a little more off your plastic tubing to get it just right.
Step Eight: Plant the area around the fountain and decorate as desired. Remember to follow all safety rules for the use of electricity and water! Use a plug that is approved for outside use and has a ground fault interrupter. If you have any questions about the electrical part of this, please be sure to ask before you get yourself electricuted!
You will soon find that your pond will attract wildlife to it. Toads and frogs will come to live near your pond. The nice thing about this pond is that a toddler or small animal cannot drown in it because the water-level is below the rocks. This will be a great decorative accent to your yard.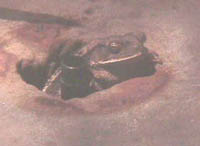 Go to top of page.
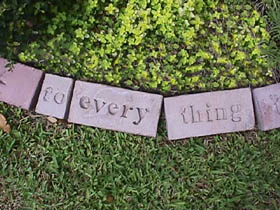 Here is a picture of my herb bed surrounded by bricks which I made from a wonderful kit made by the Magnetic Poetry people. The name of the kit they sell is Poetry Stones. I chose two scriptures from the Bible having to do with time, since I have a sundial in the middle of the bed. I had a lot of fun making these bricks, and plan to do many more. You will need to buy cement for this project, probably in at least 40 lb bags. I tried Portland Cement, because you need cement that does not have any gravel in it. However, I found that this mixture was rather sticky and hard to work with. I had much better luck buying regular cement mix and sifting out the gravel. Since it costs half as much as Portland cement, it ends up costing the same, even though you take about half of the volume out when you sift out the gravel. I'll use the gravel somewhere else. The kit contains enough dye to color several bricks, but you will need to buy more for large projects. Mix the cement so it is about the consistency of brownie mix. Please be sure that you wear gloves and a mask to filter out the dust and protect your hands. Cement will burn you. It is not safe to breathe, and the dust stirs up at the slightest movement. So exercise caution whenever working with cement. This is a great new project, and you will find many more examples of things to do with the kit on the magnetic poetry website. Go to top of page.
Melted Snowman
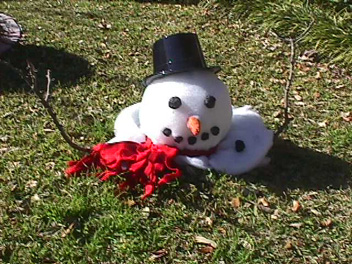 This snowman is the only kind you can usually find in our climate. To make him, you will need the following:
Some kind of ball, the size you want the head to be. I used a round wire form, but you could use a child's ball; anything will do
A piece of white material such as an old sheet, large enough to fit completely over the head
A fluffy cotton tree skirt that is meant to look like snowAn old scarf
A piece of sturdy cardboard about 8X10 inches
Masking tape
Orange and black acrylic paint
Several small lava landscape rocks
Two sticks for the arms
Glue gun and glue sticks
Put the white sheet over the ball you have chosen for the head. Secure with masking tape around the bottom. Put the sheet of cotton tree skirt over the sheet. You may need to glue this to the sheet. I used a glue gun, but you might be able to do it with the masking tape. Glue on the hat to the top of the head. Paint the lava rocks black and set aside. You will need two large lava rocks for the eyes and several small ones for the mouth. Painted black they look like coal. Cut the cardboard into a cirle. Cut a slit in the circle that reaches to the middle of the circle. Bend the circle around to form a cone and tape in place. Paint it orange. This is the carrot nose. When these pieces are dry glue them to the snowman to make the face. If the pieces sag, cut through the cotton tree skirt just under where each piece will be glued. Squirt glue into the hole you have made and then quickly push the piece into place. Hold it for a minute until it dries. Arrange the black pieces as you glue them so that you have formed a mouth, eyes, and the carrot nose. Take the piece outside where you are going to put it. Place it on the ground. Wrap the scarf around the neck and spread out the tree skirt to look like melted snow. Scatter a few black lava rocks around to look like the buttons fell off the snowman's body as it melted. Place two sticks for arms to each side of the snowman, as seen in the picture. Go to top of page.
Japanese lantern
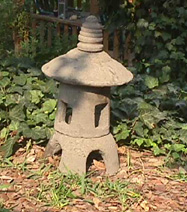 This is a picture of the Japanese lantern I made with directions I found in a wonderful -Making Concrete Garden Ornaments (see my home page). It was used by the concept of molds made out of everyday items like an oatmeal box, a plastic flower pot, and a soda bottle. Here is a picture of the parts before they were assembled.
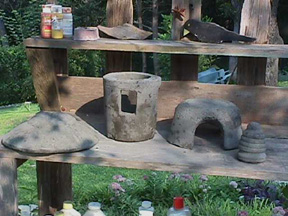
Go to top of page.
Cheap Garden Globes
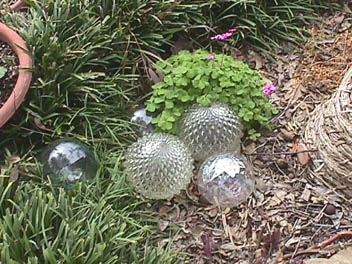
This is a quick idea for a decoration for your beds. These are just light globes I picked up at a garage sale. They cost about 20 cents a piece. Place them around your garden in groups of three or five for best effect. Go to top of page.